Cisco CDR Reporting & Analytics | Docs
Usage
- Find calls to or from a particular number
- Change which fields to display about the calls
- Click to add search terms to filter your results
- See full details about a particular call.
- Create charts to visualize data about a set of calls
- Drill down on any chart to see the calls behind it
- Seeing the calls involved in a report.
- Sharing information.
- See or Report on call activity by individuals and teams.
- Review 911 calls.
- Send an Alert for 911 calls
Find calls to or from a particular number
- From the main menu across the top, select Investigate then Calls.
- In the first textfield, where it says “find calls to/from”, type a simple DN or extension whose calls you want to see.
- You might also change the time picker to an appropriate time range.
- If you want to skip ahead and learn how to search for multiple numbers at once or for ranges of numbers, see our Search Tips page.
- If you prefer videos to documentation, you could also check out this segment of the Core UI Overview video.
Change which fields to display about the calls
The search results can only comfortably display a certain number of columns at one time, but there are hundreds of fields to pick from. Here’s how you change them on the fly to suit the type of investigation you are doing.
Adding a field
- Go to Investigate Calls.
- Click the button Edit Fields (found at top right).
- Scroll or search for any field on the left.
- Click a field you want on the left to add it to the Selected Fields on the right.
- Click apply.
Removing a field
- From Investigate Calls click Edit Fields.
- Find the field you’d like to remove on the right and click it.
- Click apply
Reordering selected fields
- From Investigate Calls click Edit Fields.
- On the right hand side click and drag any field up or down to move a new position.
Note: If you prefer watching videos you can see this in action in our Core UI Overview video.
Click to add search terms to filter your results
- In Investigate Calls, click any field value in your search results. A context menu will appear.
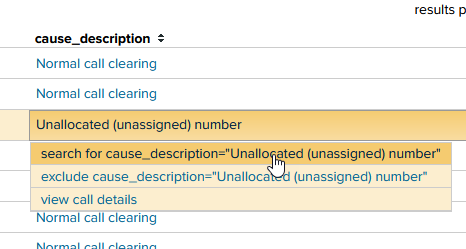
- Note that when you click these options, the end result is simply to add search syntax to the various fields above.
- For more advanced use cases down the road, you can hand-edit these terms to use boolean syntax and parentheses etc. For more details on this see our Search Tips page.
See full details about a particular call.
- From the main menu across the top, select Investigate then select Calls.
- Enter one or more extensions or DN’s, and/or search terms (see above).
- Click any field value to bring up a context menu and then click the option view call details.
- The resulting page displays a wealth of detail and charts about this individual call, with interactive elements and field pickers for various panels.
Create charts to visualize data about a set of calls
- From Investigate Calls, at any time you can click the blue link that says graph calls over time (it is on the far right side)
- This will carry over all of your search filters into the Chart page, and instead of displaying calls as tabular data, it will default to a call volume report.
- Note that you can change over time and split by to be any of the hundreds of fields available.
- To get a feel for it, change over time to say over device_type
- change the column type to “bar”
- change split by from “(none)” to “type”
- This will give you a breakdown for each device type, further split by incoming / outgoing / internal call counts.
Drill down on any chart to see the calls behind it
- From any displayed chart in the Chart page, click a bar or column or line marker.
- A context menu will appear. Select investigate these calls and you will go to the Investigate Calls page, with additional searchterms added to narrow down to just the calls representing the column or bar you clicked on.
See or Report on call activity by individuals and teams
You want to be able to pick a time range and one or more departments or groups and see an overview of call activity for all the individuals in that group or in those groups. Total inbound/outbound/internal call duration and inbound/outbound/internal call counts.
- From the main menu across the top, select Browse then select Extensions.
- Click in the group field and check/uncheck groups as desired.
- <optional> Add a name into the name field. Wildcards are supported, like brian* to find all names starting with “brian”
- <optional> Add a phone number into the number field. This follows the multiple numbers and hyphenated ranges as above.
- <optional> Change the drop down for time to an appropriate time period.
For more tips on searching for multiple numbers at once or to search by ranges of numbers, see our Search Tips page.
Reviewing and Alerting on Emergency/911 calls
- From the main menu across the top, select Investigate then select Emergency Calls.
- You will see any recent emergency calls and some help text about customization.
If you want to configure an alert to email you when there’s an emergency call:
- On the right, select the option to Enable or disable in “Settings > Searches, Reports & Alerts > 911_Calls.
- This opens to the search in edit mode. Click Cancel.
- In the underlying Searches, Reports, and Alerts screen, click Edit next to the search 911_Calls.
- Select Edit Schedule from the drop down.
- In the Edit Schedule screen, click Schedule Report.
- Leave the options at their defaults and click Next.
- In the next page, you should see Send Email is already enabled.
- Paste in the email address of the recipient. If there is more than one, separate them with commas.
- Set other options as necessary.
- Also be sure to read the special notes along the right side!
- click Save.