Cisco CDR Reporting & Analytics | Docs
Using Location fields
For both internal parties and external parties, the Cisco CDR Reporting and Analytics app augments your call data with many additional fields created on the fly that represent location information.
These fields can all be used as easily as if they were fields in the raw CDR, for filtering searches, and as primary and secondary fields in your reports. Furthermore you can mix and match these in individual reports and searches with not only other CDR and CMR fields but also with all the other fields added on the fly, for instance by the Groups Lookup or Devices Lookup etc.
For more general examples of Location use cases see our overview page for Location and Site Analysis
Location fields for internal parties
Once you or your colleagues have set up the Sites lookup then for each call leg shown in Investigate Calls, the site names will be reflected in the fields origSite, destSite and site.
Location fields for external parties
All full DN’s get parsed by the app automatically at search time and fields will be extracted for country, country code, area code, exchange, city, state, zip, LATA, CLLI and actually quite a few more. As with core CDR fields, each is defined separately for orig* vs dest*.
callingPartyAreaCode, finalCalledPartyCountry, etc.
If some or all of your CUCM clusters are outside the US you can quickly tell this to the app, and it will modify its parsing rules to account for regional dialing prefixes and patterns. For specifics see step 5 in our install docs.
Using these fields in Investigate Calls
To add them to your results right away in Investigate Calls — simply review our general Usage docs for changing your selected fields. You will find the location fields described above listed in Edit Fields, and you can select them like any other. Once a location field is selected and displayed in your search results, review our Usage docs for how you can add them as search filters just by clicking on them.
Using these fields in the Chart page
If you have not already, review our Usage docs for creating charts.
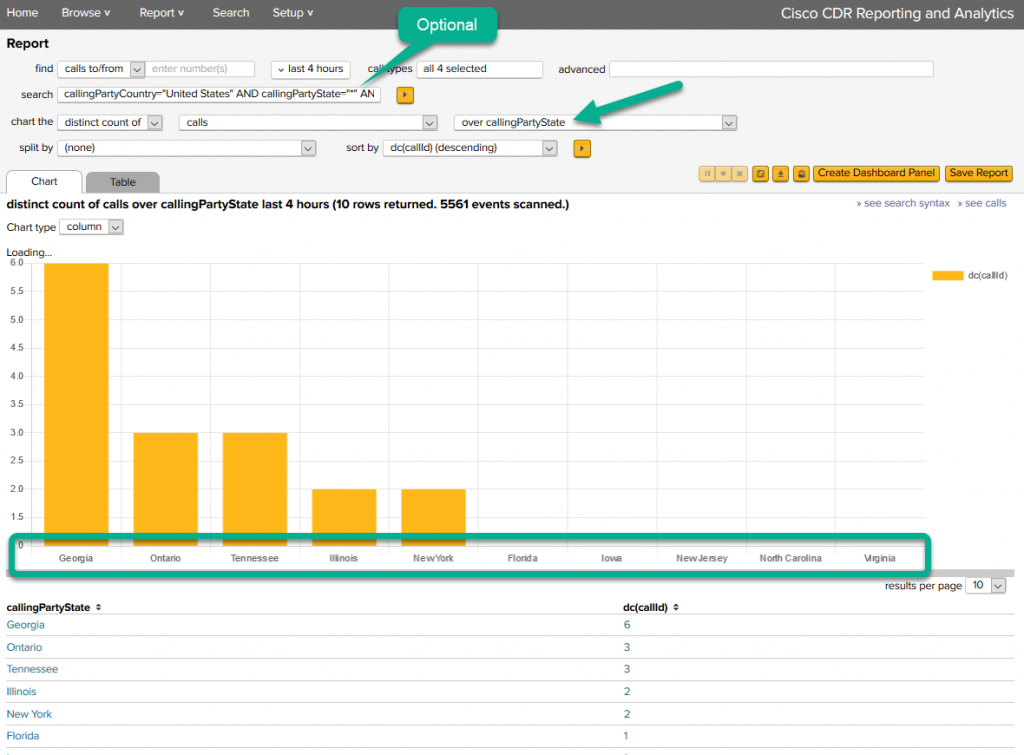
For a specific example try setting type to just incoming, then changing over time to over callingPartyState. This will give you a column chart breaking down inbound calls by the state/province of the caller.
Switching back and forth between Investigate and Chart
Remember from our Usage docs that from any chart you can always drill down on elements to see the actual calls, and conversely from any set of search results you might have in Investigate Calls, you can always create a chart from that investigation, and set the over field to quickly spot-check the breakdown of these calls by site, or callingPartyCountry, or any location field at all.
Using Investigate Sites
Navigate in the app to Investigate > Sites. If you or your colleagues have set up the Sites lookup, this page will give you a rollup of call stats for each of the sites you have entered.
Click any row in these results to visit the Site Detail page and see additional detail for that selected site.
Further exploration
To learn more about individual location fields, return to the app in Splunk, click Home to return to the landing page. Now locate the Explore fields panel in the bottom right, and change filter by area to Location fields. You will see a short description for all of these fields as well as a few sample reports you can click.
To find potentially interesting charts with just a couple of clicks, return to the app’s landing page and within Explore new reports on the lower left, click Locations
If you have any comments at all about the documentation, please send it in to docs@sideviewapps.com.