Cisco CDR
Alerting
December 20th, 2019
Building a custom alert
We get occasional questions involving alerting. While we have a built-in 911 alert, we don’t build in any others. This is of course because no two needs are close enough that one alert would work for both except maybe in that “Someone made a call to emergency services” scenario. But as you’ll soon see, building your own alerts isn’t hard!
Alerting is split between our app (which creates the searches that you’ll use to build an alert with), and core Splunk (which is used to build out the actual “contact me when that search returns data” alerts.
The scenario we’ll use
Samantha’s staff have been repeatedly told to stagger their naps so that the phones are always being answered during business hours, but they don’t always do this. Sometimes she wakes up from her own nap and finds the entire phone team snoring peacefully on their “quiet time” mats.
What Samantha would like is for every half hour or so, check to see if more than 2 calls came in during the previous half hour that had a cause_description of “No answer from user (user alerted)” or “No user responding”. She should get an alert if that’s the case, because then her email would ding and alert her that she needs to go wake some people up.
Creating the search:
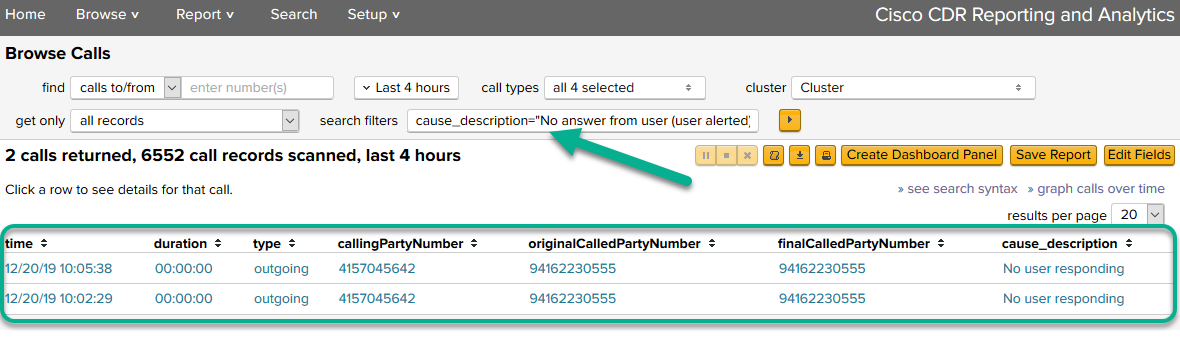
The first task is to narrow down Browse Calls to the cause_descriptions you want. There’s no built-in drop-down for the various cause_description values you might see, so we’ll use the Search field to manually filter.
cause_description="No answer from user (user alerted)" OR cause_description="No user responding"
Obviously substitute anything in there you want.
Also while you are in here, add/remove the fields you want to have included as part of the alert’s email to you. Here I have a pretty standard set of fields, but yours can be whatever you want.
Lastly, feel free to adjust any and all of the other search fields and drop-downs. I am running this on my test data, so I have to do 4 hours to have any results at all for this – it’s OK we’ll switch it to the right time frame later.
Do not at this point worry about any thresholds – we’ll set those in the alert itself.
Moving from the Cisco CDR app to Splunk
Once you have a search showing you results that you would alert on (or at least would if the count of those were above some threshold), then click the

link in the upper right by the Edit Fields button.
This will open a Splunk Search window with some SPL already in place. It should also run the existing search once and display results. The results will look something like this. That markup is for the next section, so keep reading…
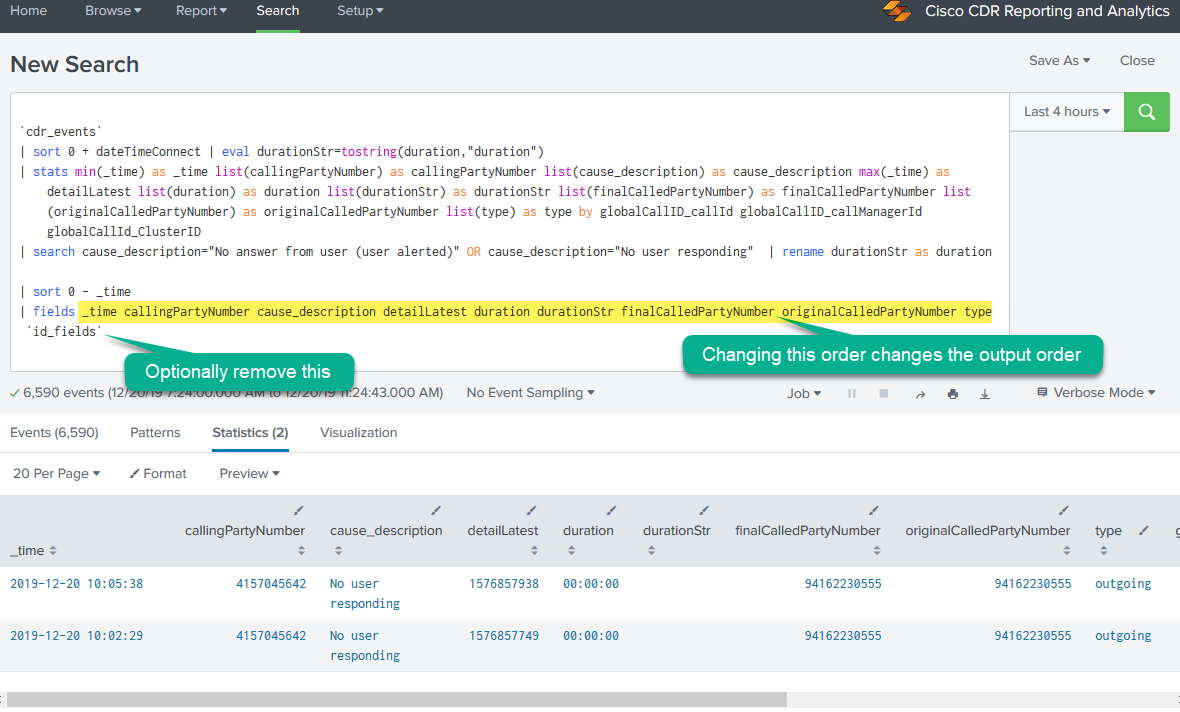
Removing ID fields or changing field order, if necessary
When you clicked the “see search syntax”, the resulting SPL *also* includes some id fields on the right of the table of output. The fields are globalCallID_callId, globalCallID_callManagerId, and globalCallId_ClusterID. If you like those, fine. If you don’t need them, you can remove them by removing a bit of the last command in the window:
| fields callingPartyNumber cause_description detailLatest duration durationStr finalCalledPartyNumber originalCalledPartyNumber site type
`id_fields`
In that section take off the last bit – ‘id_fields‘. I don’t know why it’s on it’s own line, but honestly that makes it easier to see and remove. 🙂
Anyway, when you remove it, you can re-run the search and you’ll see the id fields have been removed.
Also, to change the order of the fields in the output, just change the order they’re listed in on the line just above that, highlighted in yellow.
Deciding on time frames
A decision has to be made – remember that CDR data comes in *after the call completes* on one minute intervals (by default). This means you can’t find call information until that call terminates.
What this means
If you are looking for calls that the very act of those being there means the call is terminated, like cause descriptions of Temporary failure or CCM_SIP_406_REQUEST_TIMEOUT, or ones that that at least imply it like User busy, then you can search for things pretty much right away. This is what we’ll do because our search criteria works with this.
If instead you are looking to set alarms on conditions that involve actual calls, for instance if you want to be alerted any time more than 20 calls happen in any 1 hour period, then you might have to report on the previous full hour and set it to alert you at half-past the hour. Like, at 10:30 you would have an alarm that looks back at the 9 – 10 hour and counts those calls, because chances are all or at least most have terminated by 10:30 and so would be in the system. If you need help with this situation, please shoot us an email! We’ll create an abbreviated version of this tutorial for this sort of use case – finish going through this one once, then just go all the way down the end of this blog and you’ll see another example.
Set the time picker
Click the time picker, and set the options like below. Obviously this is to look back 30 minutes ago.
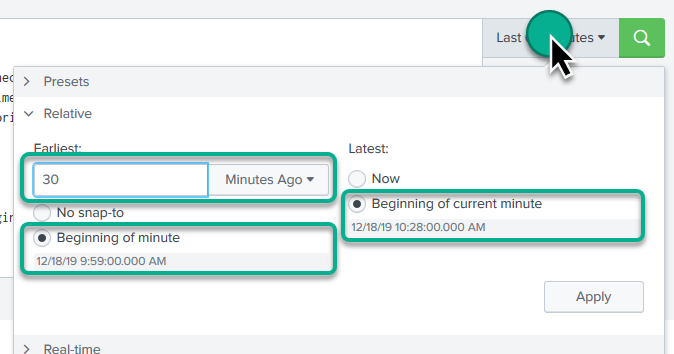
When you click Apply the search should refresh and … at this time you may or may not have results, but that’s OK.
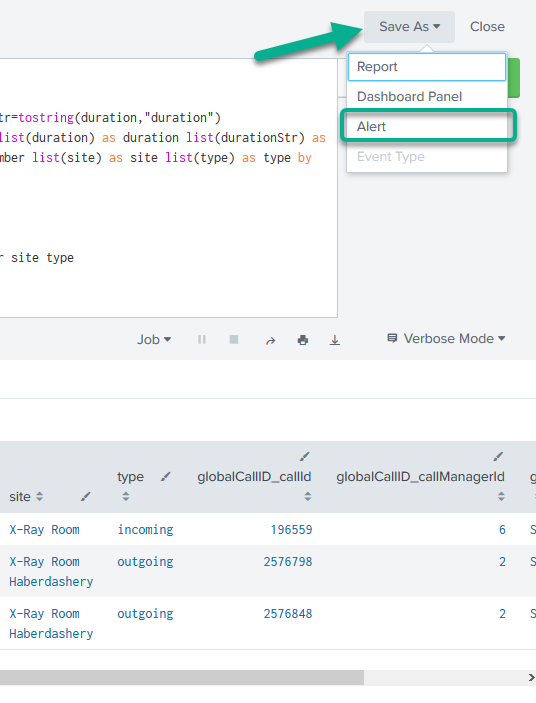
Create the alert
In the upper right, click “Save as” then “Alert”
Then set the alert properties to something like this:

Confirm the non-outlined settings, but those are I’m pretty sure at their defaults. The ones to really check and change are:
- Give it a name that’s more accurate than mine.
- A schedule (see next paragraph)
- And a trigger condition. For instance, here I’m setting the alert to fire when there’s 2 or more results returns by the search. If there was 1 or 0 events, the alert won’t fire and it will stay silent.
Schedules and Cron
If you can use a “regular” schedule, do so! The regular schedules include things like “At 15 minute past the hour, every hour of every day, look back at the previous full hour for the results. Or every Monday morning look at the entire previous week. These are great and easy to use. In fact, if we were counting calls that took time, we’d use one of those (see way below at the bottom!).
But we’re not using one because we’re trying to to do something a little off the built-in paths.
This cron entry is “*/30 * * * *”. This entry makes it so that it triggers on any minute divisible by 30 (0 and 30 minutes past any hour), any hour of the day, any day of the week, and so on. If we only wanted to trigger between 6 AM and 6 PM, we could have written it “*/30 6 – 18 * * *”
You can read about cron in Splunk’s docs https://docs.splunk.com/Documentation/Splunk/8.0.0/Alert/CronExpressions .
Adding an action
That’s all fine and dandy, but we have yet to tell the alert what to do when triggered. If you drop down the “Add Actions” at the bottom you’ll see there’s all sorts of options. I leave it to you to investigate the others – we’re just going to set up an email alert.
So from the “Add Actions” drop-down, pick the “Send email’ option, then fill out things like below.
I really like including the results as an inline table in the alert email. You can read more on Splunk alerts in their docs:
(the menus on the left have more – including in one section the Cron information)
If you have problems getting it to ever send an email, make sure you have the email stuff set up in Settings/Server Settings/Email settings!
Final thoughts
This technique is applicable to nearly any alert you can dream up a search for.
I do recommend starting slowly – send the emails only to yourself until you are sure they work right. Maybe even just set up the searches and run them a few times at different periods to see if they’ve fired or not, before actually setting up the searches. Another trick I use is, if it’s something that isn’t expected to happen very often (like 1000 calls last hour), change it to something lower like 10 calls last hour just to test it once and make sure it fires, emails you and looks right. Then change the threshold back up to 1000.
Time Frames for non-trivial calls
As mentioned above, the timings and time frames we were using are only really effective for calls that terminate nearly immediately.
But let’s suppose that Mildred’s phone takes calls from folks who want to buy her Amazing and Wonderful Wigs. They are in competition with Samantha’s team, who takes calls about Samantha’s Stately Storm Gutters, to see who can make the most sales this week.
Mildred knows about how many calls Samantha’s team does in an hour – about 15. She’d like an alert that tells her when her team takes more than 15 calls in a one hour period because it’ll make her happy to know they have a chance that hour!
(Now, keep in mind this might actually be better as a daily report instead of a hourly report, but let’s just go with the story here…)
The flow is much like above, with just a few changes.
Creating the search
The search in this case might be to select a call type of incoming. It’s unlikely a zero duration call – or even one very short – would involve actually making a sale, so let’s put in the search filters a filter of duration>10 so we only see calls that lasted longer than 10 seconds. We also don’t care much for calls where we transfer them away to the help desk or something, only calls that the team takes and doesn’t transfer. To do this, we’ll also add in to search filters legs=1. (Note, this is the same as transfers=0, just in case you wanted to use that way of thinking about it.
Something like this:

Follow through the steps above until you get to the section for the time picker.
Set the time picker
In this case, we can’t search for the last few minutes because calls that started a minute ago are probably still happening. So what we’ll do is set an hourly search to happen looking back at the previous full hour.
So set the time picker to custom Relative time with the Earliest of 1 hour ago (not 60 minutes!), then snapp both Earliest and Latest to the nearest hour.
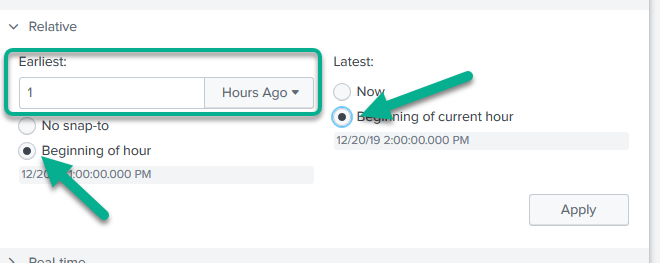
When you do that, you’ll see the little “indicator date/times” under each of the “Beginning of …” buttons changes, and you can see that it then snaps it backwards to the previous full hour.
Create the alert
All the steps here will remain the same except you’ll pick a different schedule. One of the built in ones, in fact.
Here we’ve said to run every hour, at half past that hour. So at 10:30 it’ll look back at the 9 – 10 hour and fire an alert if our threshold has been surpassed. At 11:30 it will look back at 10 – 11 and do likewise.
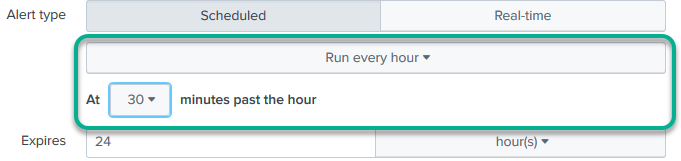
And everything else is more or less the same! (Obviously you may need a different threshold!).
Related
Great software ultimately has to empower you to achieve more in less time. This extends to the company behind it -- we have to remember to always use your time as efficiently as we can.
And here I am happy to say that we shortened our Product Overview video dramatically. The new one is only 4 minutes long, vs 11 for the old one. You can see it here:
NOTE: the old one showed more of the product and was definitely more complete. In fact this was deliberate because we used it both for new users and also to be a deeper onboarding video for everyday users. However it was a bit too long for anyone who just wanted the short version and didnt want to spend 11 minutes of their day.
February 1st, 2024